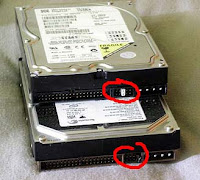
First a slave drive is an extra hard drive that can be added to your existing computer in order to give you an optional area to store files. Your computer already has one hard drive called the master drive. This will add another hard drive which will be called a slave drive. So inside your computer tower there will be two hard drives now. This slave drive will not hold the operating system but it is a great place to hold your computer documents, pictures, music and game files. Also this is a great option for you to store you backup files of your operating system.
Only two tools you need to do this operation. The first is a screwdriver and the second is a anti-static wristband.
Instruction
1. Shut down your computer and unplug all the cables on the back of the computer tower.
2. Remove the cover of the computer tower; some towers have screws holding on the cover while others have latches. All depends on the manufacturer.
3. Take the drive that you are going to use as a slave drive and switch out the jumpers on the back side of the hard drive by the connectors to make it a slave drive. Look carefully at the jumper settings chart on the hard drive to make sure you get the jumper settings correct. If the jumper settings are not correct then the computer will not boot correctly or the slave drive will not be recognized.
4. Find the ribbon cable going to the original hard drive. There should be an additional blank connector on the ribbon cable for an extra hard drive.
5. Mount the slave drive into an empty open bay.
6. After the slave drive is mounted install the ribbon cable using the extra connector on the ribbon cable and locate an unused power connector coming from the power supply. There should be a few extra power connectors. Make sure that you are able to slide the connector into the slave drive without much force. The top of the connector corners are rounded and the bottom corners are squared, so there should be only one way that the connector goes onto the IDE slave drive.
7. Put the cover back on the computer tower, install all the cables that you uninstalled on the back of the computer.
8. Turn the computer on and with some models you may have to change the bios settings to recognize the slave drive, but with most computers it should be recognized without and changes to the bios settings.
9. Double click on My Computer and take a look at the hard drive location. Both the master and slave drive should be recognized. It would be a good idea at this time to right click on the slave drive and format the drive to make sure it is totally clean to use to store files.
For Email Newsletters you can trust


